Compose and arrange
Create songs from tracks, place clips on the timeline, define loop regions, duplicate ideas, edit time, and shape arrangements without leaving the main workflow.

A macOS digital audio workstation with a streamlined workflow for arranging audio and MIDI clips, hosting Audio Unit instruments and effects, editing notes, exploring generative musical ideas, automating parameters, mixing tracks, and exporting finished audio. It can also serve as a generative MIDI source, sending its generated notes to your favorite DAW for use with your existing instruments and production workflow.
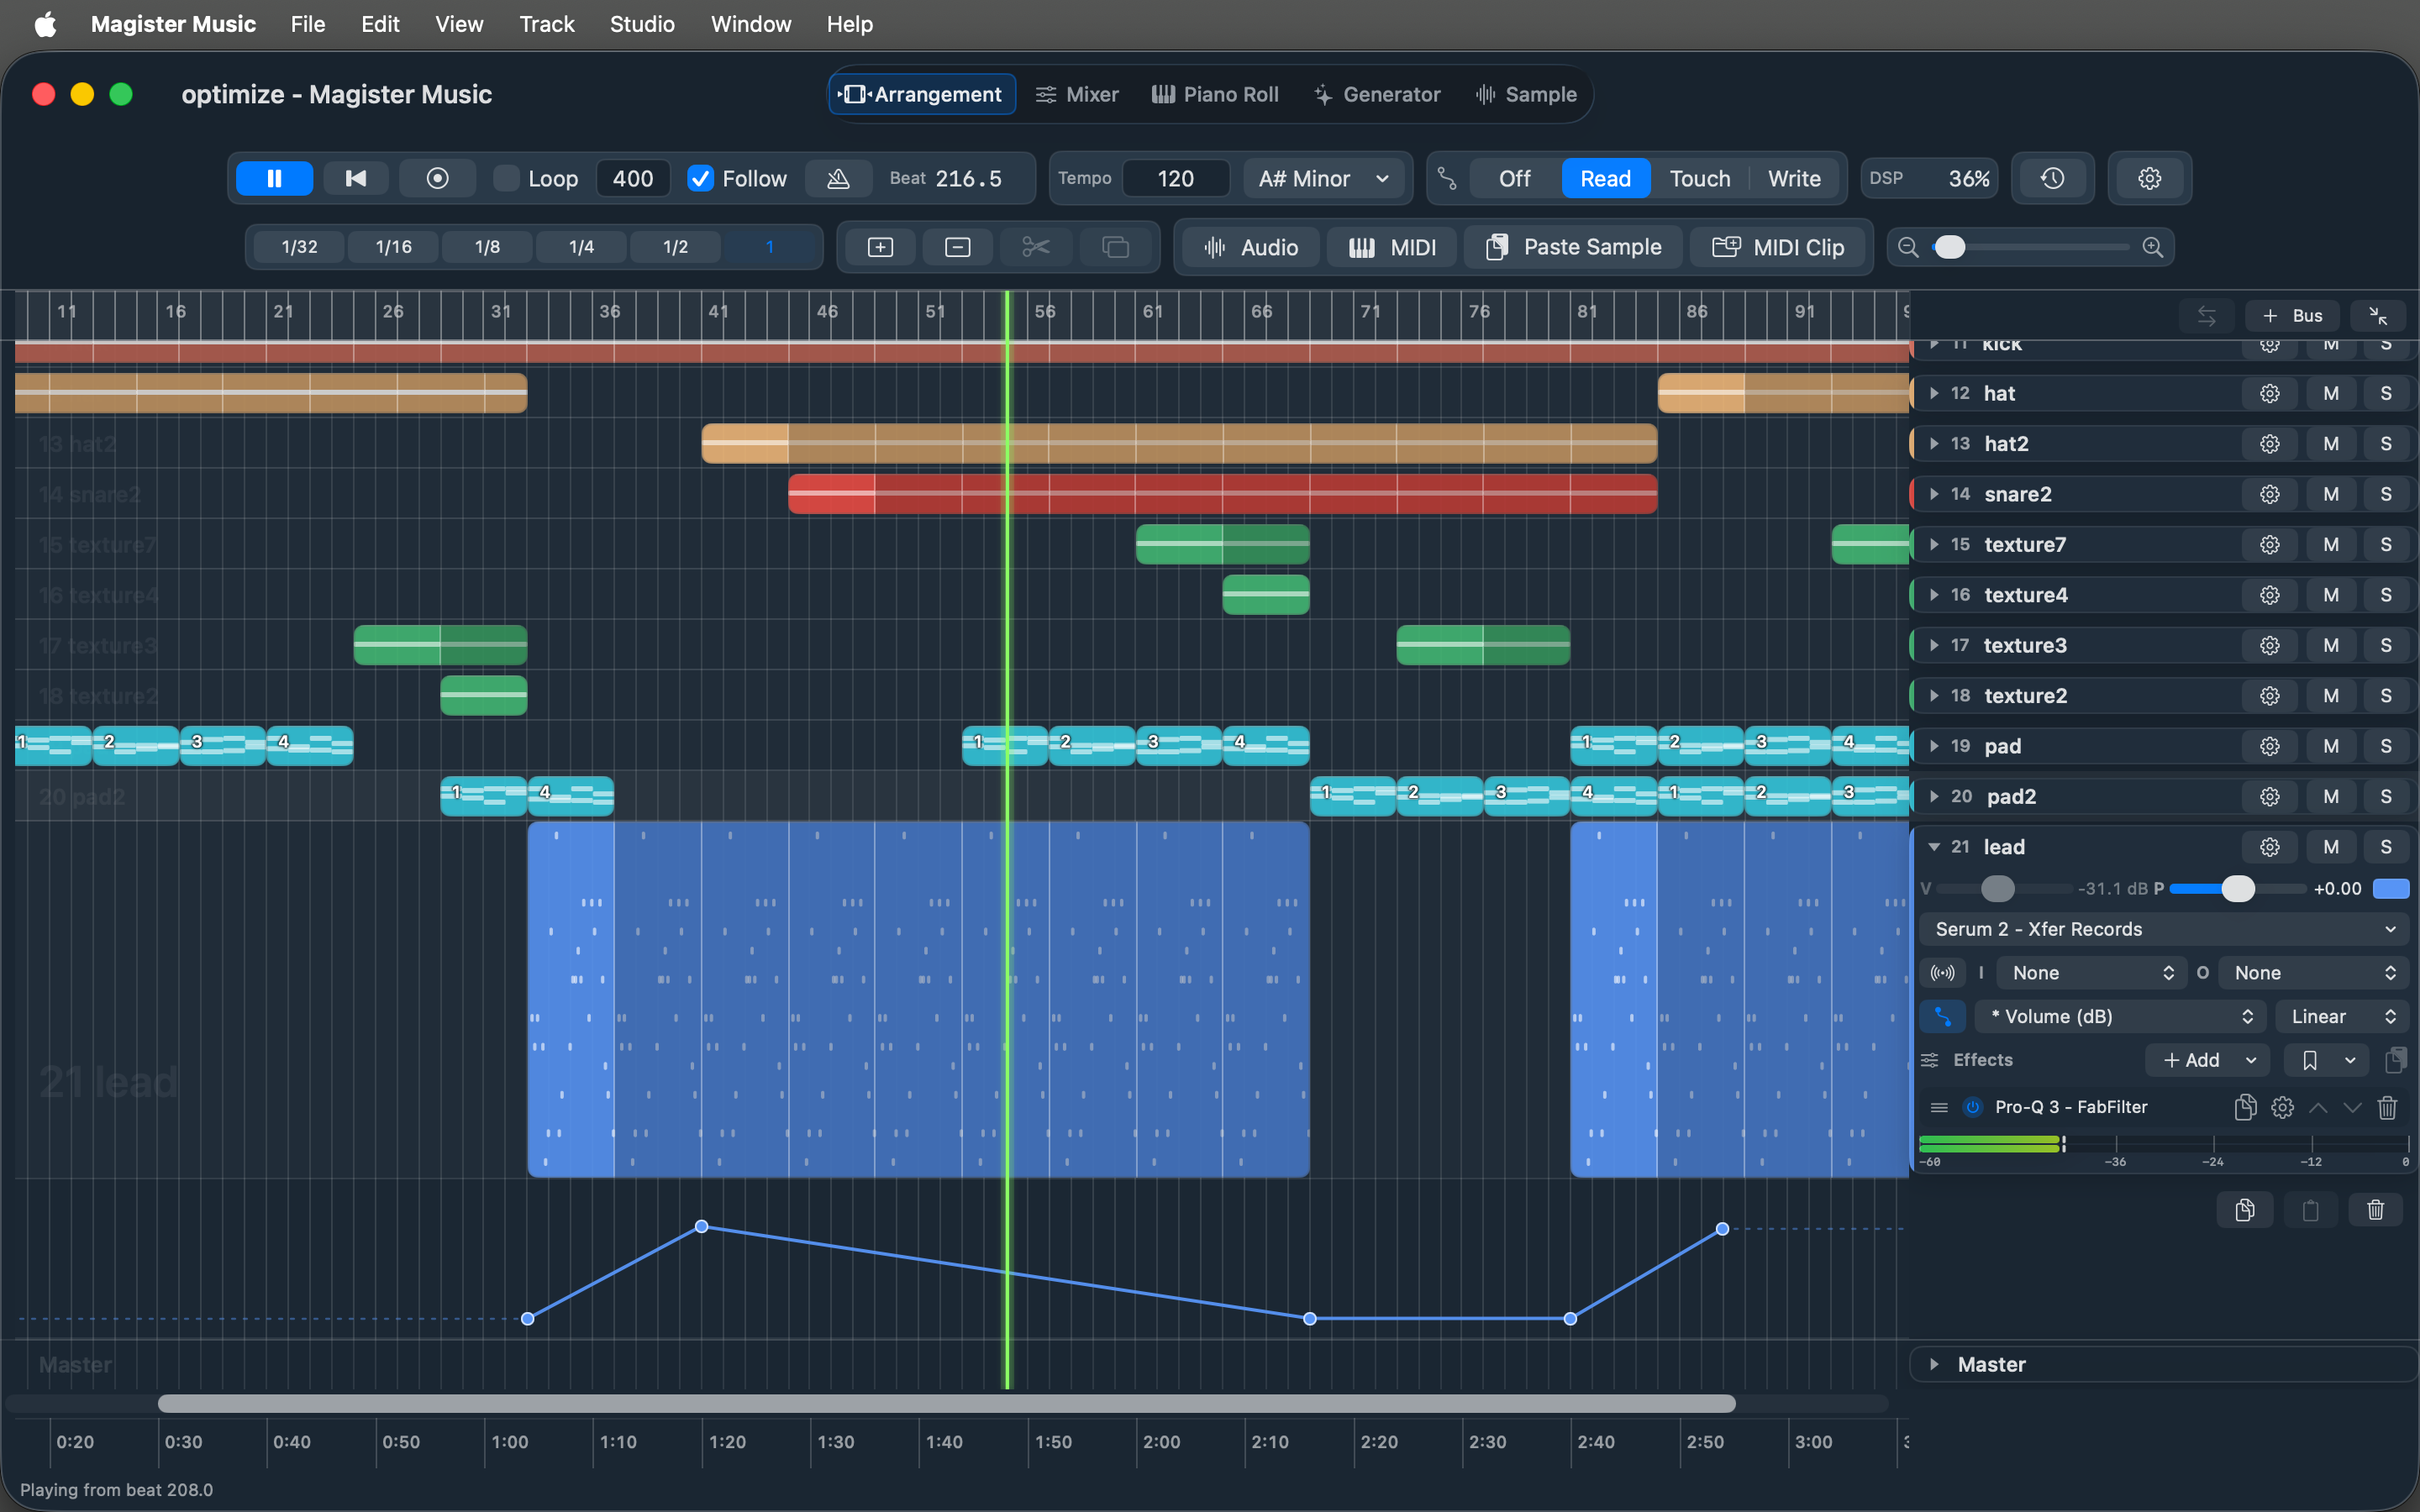
Magister Music is built around fast arrangement, MIDI editing, Audio Unit hosting, and generative composition tools.
Magister Music brings the core pieces of a production environment into a direct, native Mac interface designed for rapid creative iteration.
Create songs from tracks, place clips on the timeline, define loop regions, duplicate ideas, edit time, and shape arrangements without leaving the main workflow.
MIDI tracks can host Audio Unit instruments, while tracks and the master channel can use effect plug-ins for sound design, mixing, and final polish.
The Generator view helps create and reshape MIDI patterns by controlling model, length, pattern type, octave, variation, velocity, timing, and musical tendency.
Each view is built around a specific part of the music-making process, from timeline structure to detailed audio and MIDI work.
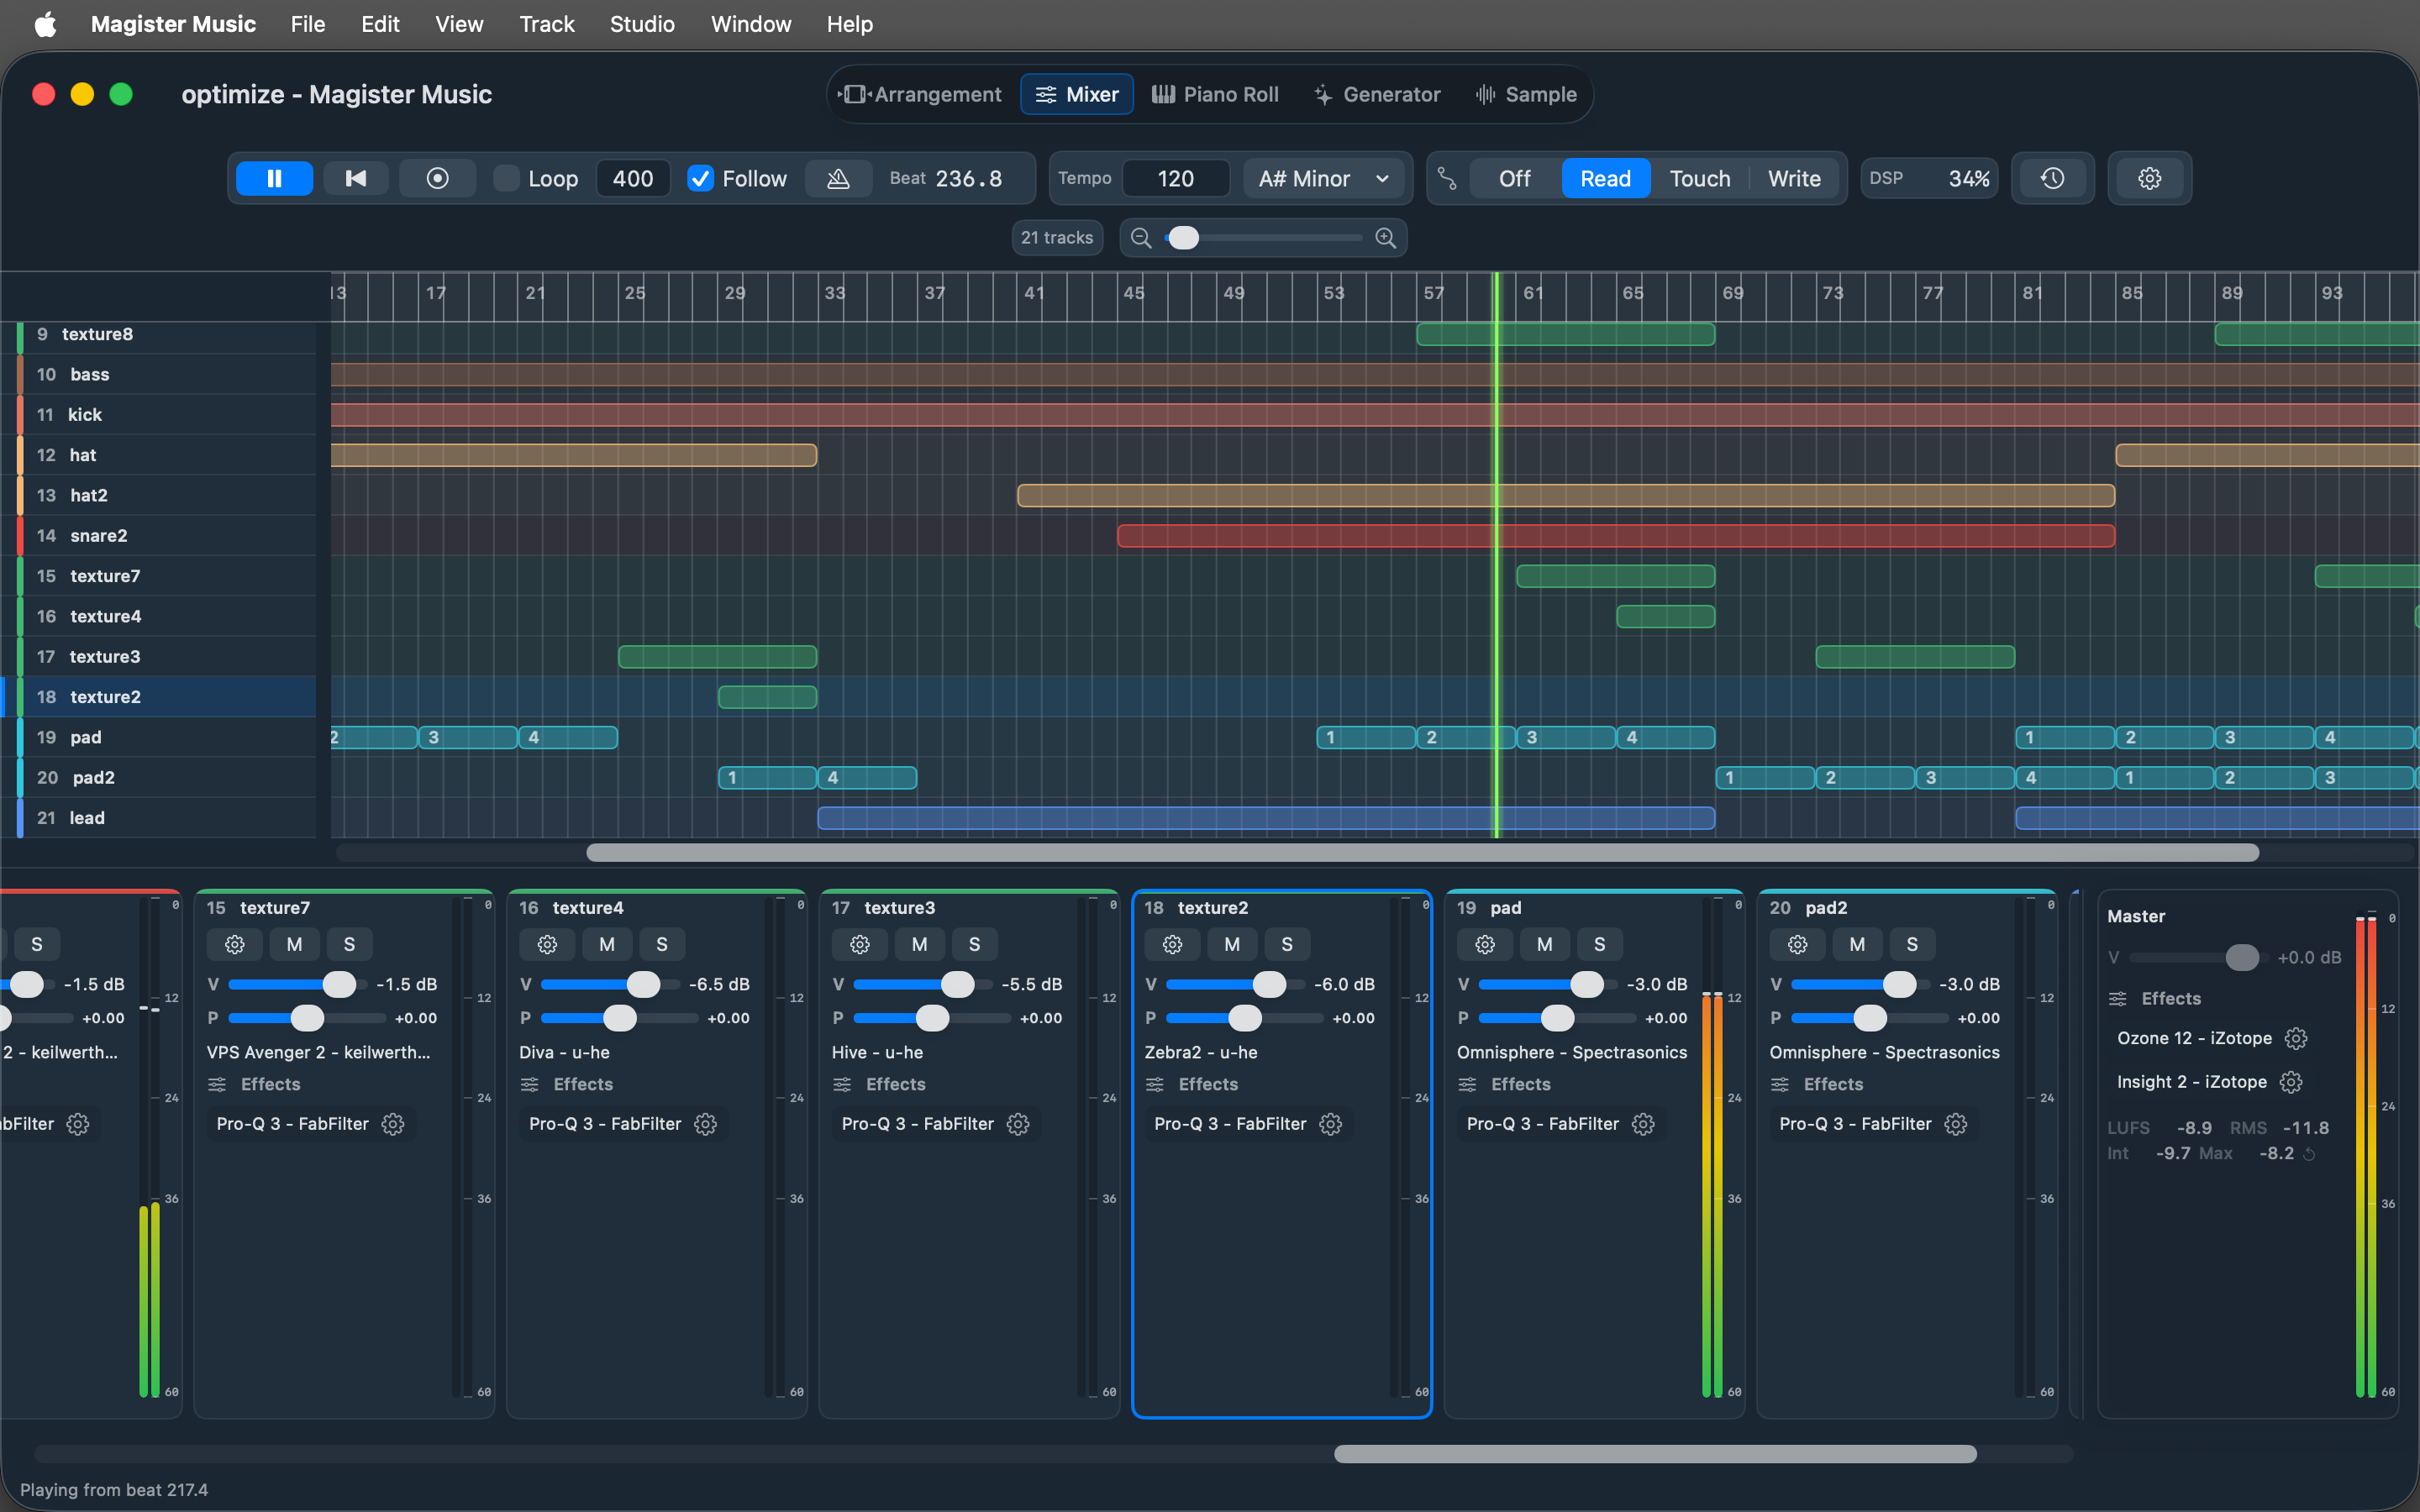
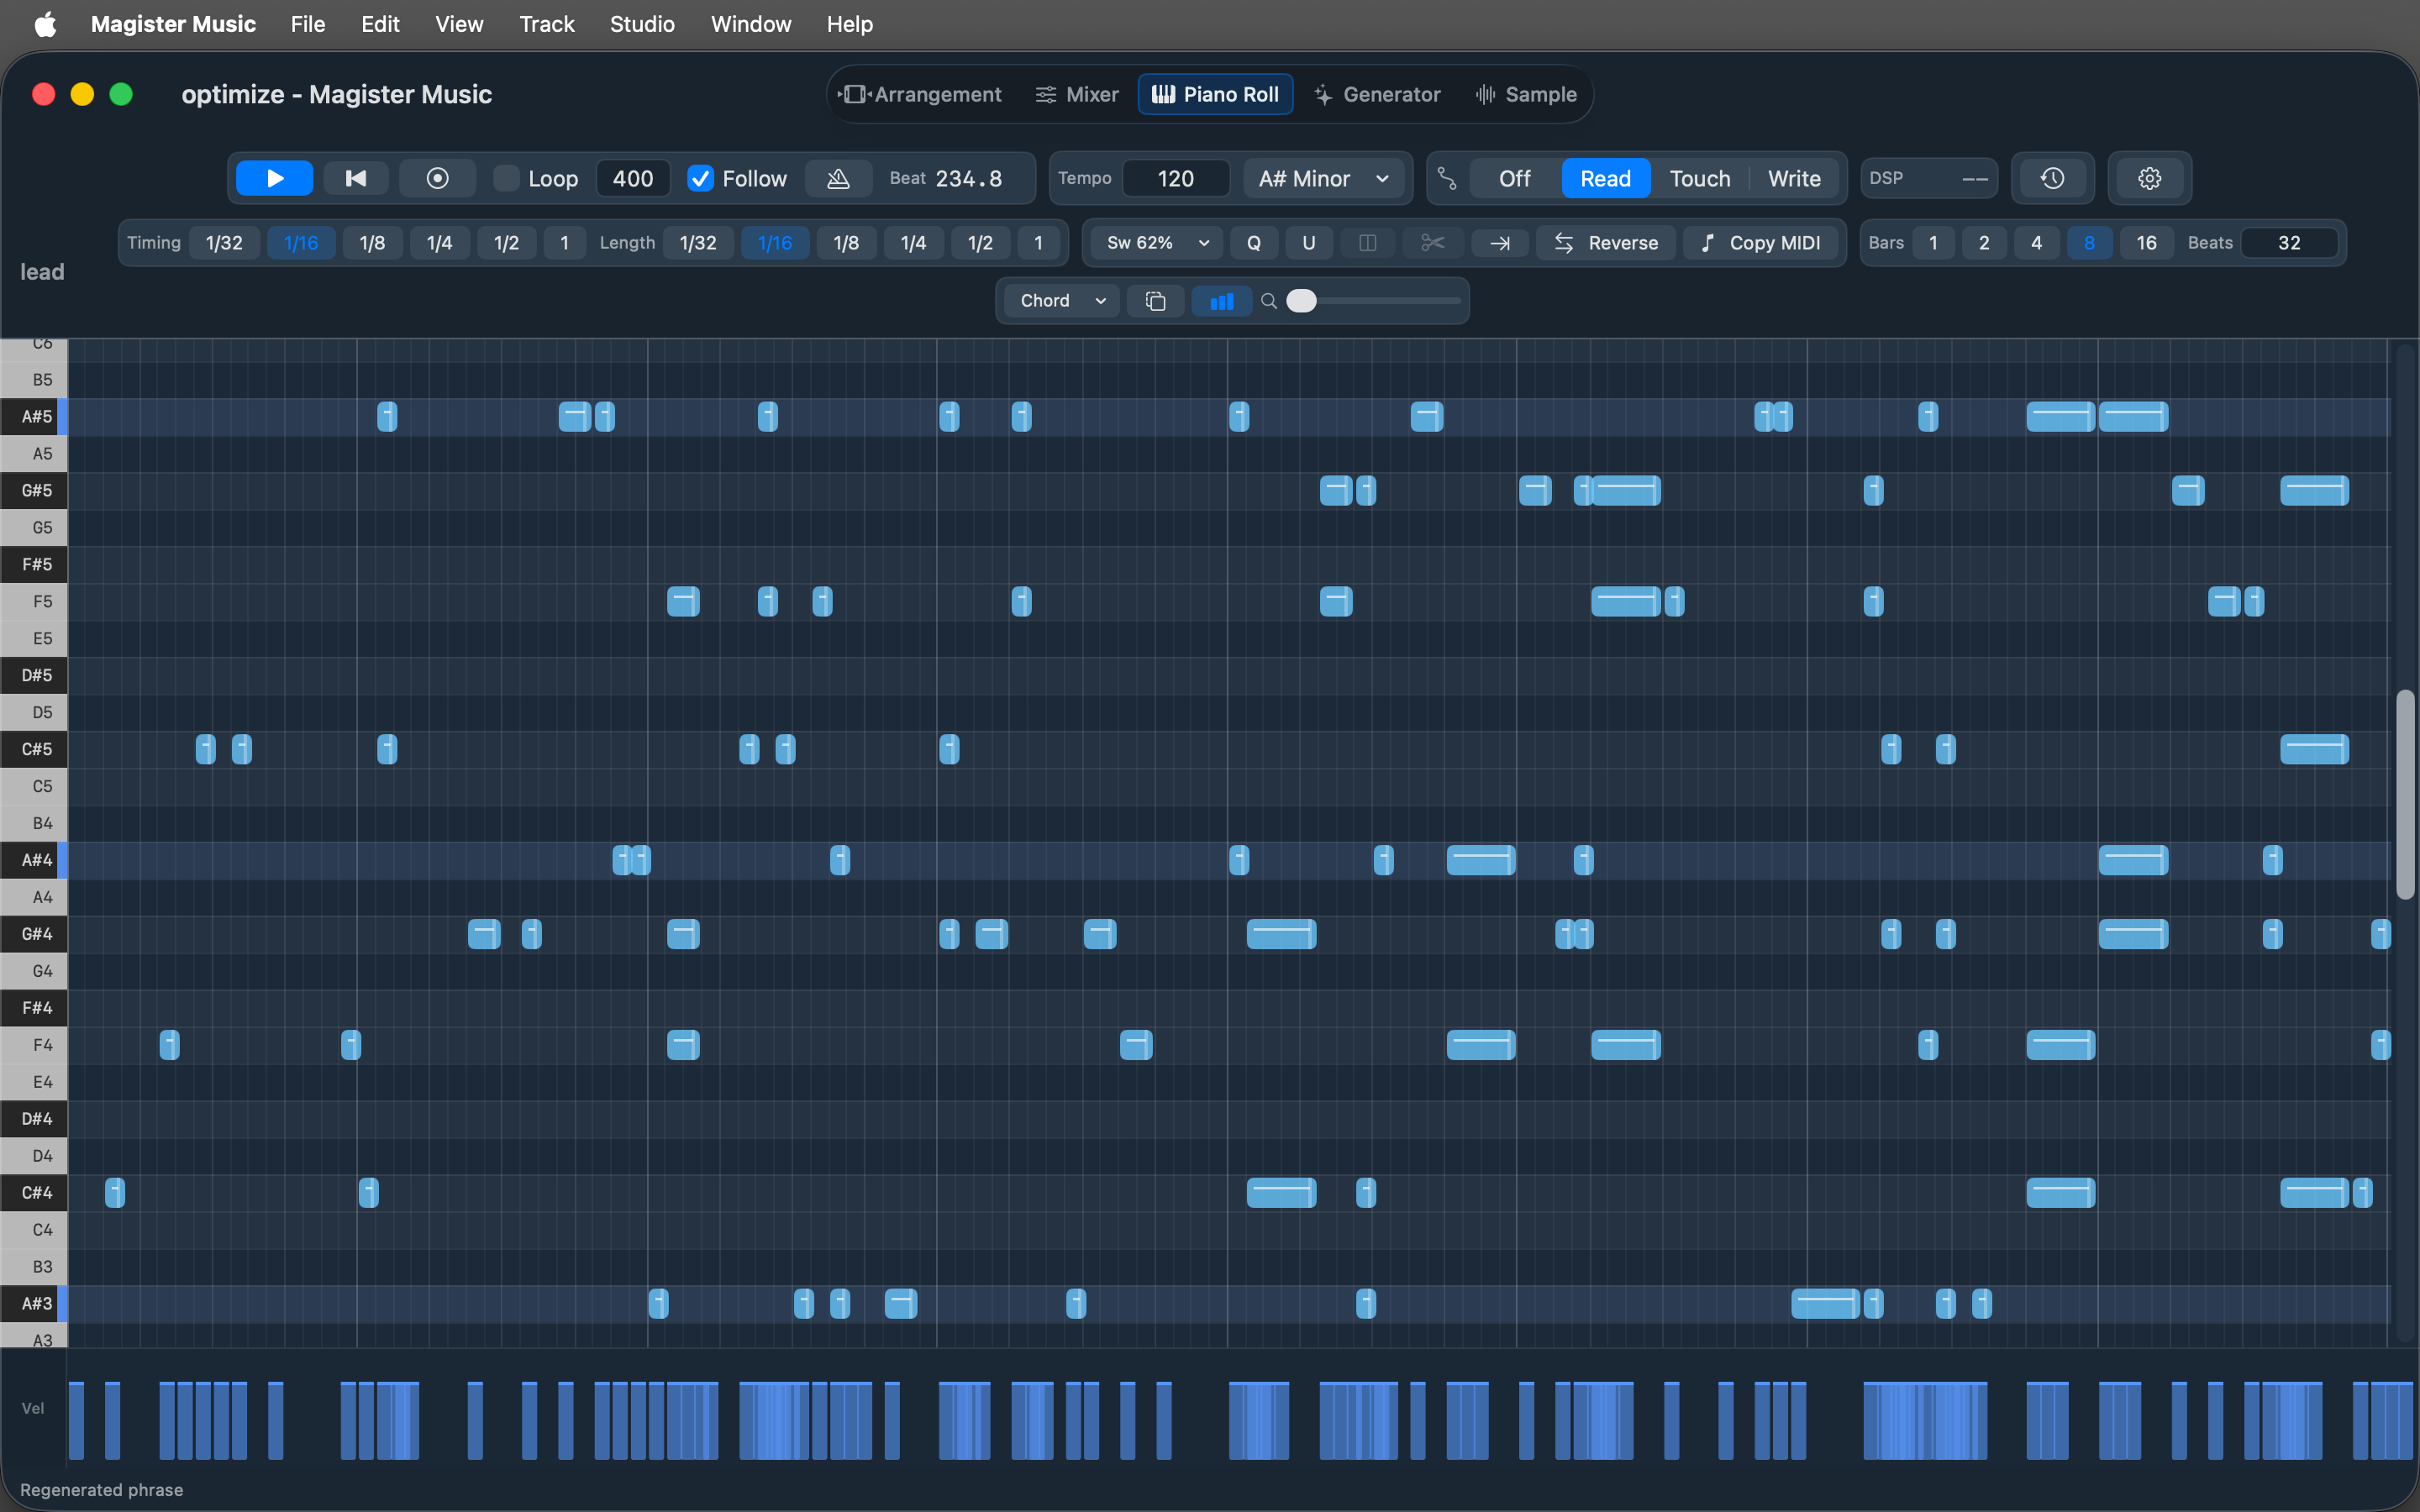
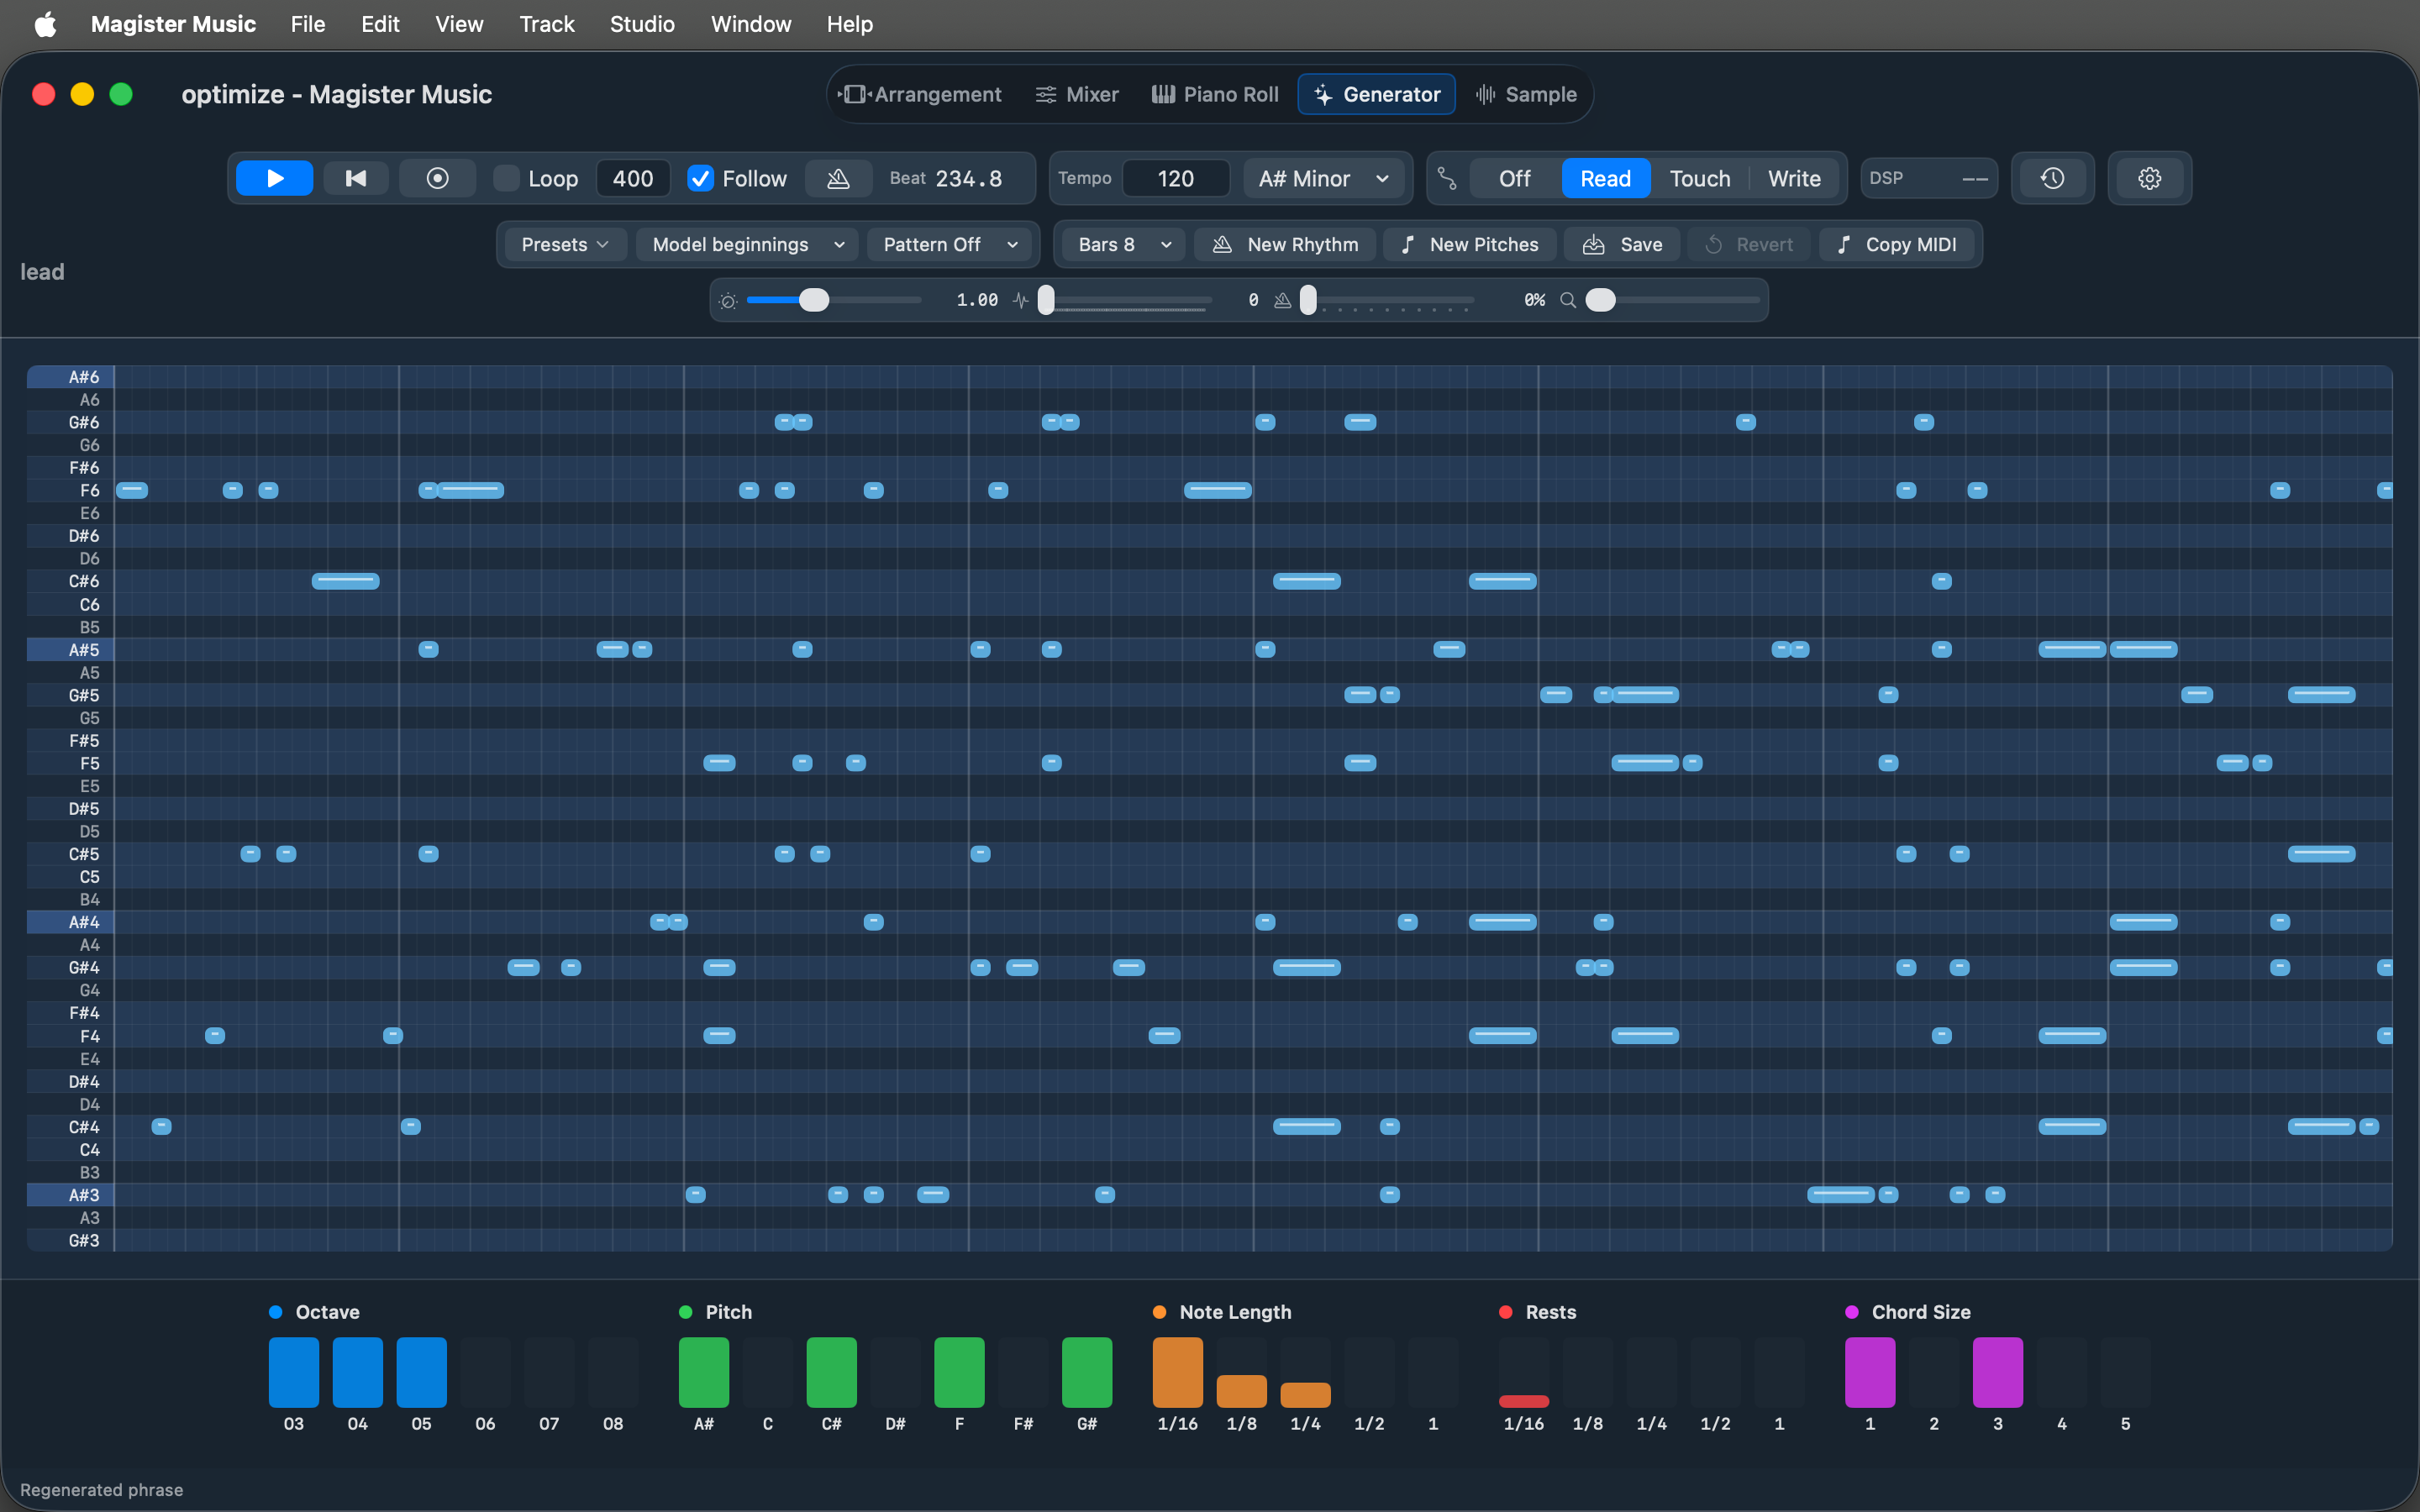
Magister Music supports the practical production path: start a song, add audio or MIDI tracks, load instruments, edit notes, automate movement, mix levels, and export WAV, M4A, or MP3 files.
These tracks were created entirely with Magister Music, then arranged, mixed, and exported from the same project environment.
Magister Music can integrate with your existing production setup as a generative MIDI source. Its virtual Magister Notes MIDI output sends notes from the Generator view to another application, allowing your preferred DAW to receive them and play them through any instrument in your existing collection.
This mode allows you to use the generative features of Magister Music to produce notes in your favorite DAW. Choose a model, pattern, and sequence length, then shape the musical result through controls for pitch, octave, chord size, rhythm, note length, velocity, timing, and variation. You can generate new ideas, preserve a rhythm while exploring different pitches, or keep the pitches and create a new rhythm.
The Magister Sync MIDI clock input can synchronize Magister Music with an external application or device. With your DAW providing the clock and receiving notes from Magister Notes, you can audition Magister Music's generated patterns through your own instruments and record the resulting MIDI directly into your usual workflow.
The full guide below gives a more detailed view of Magister Music concepts, views, commands, and shortcuts.
Magister Music does not include built-in instruments. To create sound with MIDI tracks, you must supply your own Audio Unit instrument plug-ins. The app includes built-in MIDI effects and built-in compressor and limiter audio effects; other audio processing comes from your own Audio Unit effect plug-ins.
Magister Music is a macOS DAW (Digital Audio Workstation) for arranging audio and MIDI clips, hosting Audio Unit instruments and effects, editing MIDI, generating musical patterns, automating parameters, mixing tracks, and exporting finished audio.
This guide describes the app from a user perspective. It focuses on what you can do and where to find it.
Magister Music does not include built-in instruments. To create sound with MIDI tracks, you must supply your own Audio Unit instrument plug-ins. The app does include built-in MIDI effects (arpeggiator, chord, and more) and built-in compressor and limiter audio effects; other audio processing comes from your own Audio Unit effect plug-ins.
Before using Audio Unit instruments or effects in a song, open Preferences and choose the plug-ins you want Magister Music to make available. Selected plug-ins then appear in the instrument and effect selection controls in Arrangement view. These preferences are stored globally, so enabled instruments and effects are available across new songs you create.
Preferences also include the audio buffer size. The default value of 512 is recommended for most users, but if you notice latency, timing discontinuities, clicks, or pops during playback, you may adjust this setting to better suit your system and plug-in configuration.
Preferences > Interface).Magister Notes MIDI output and a Magister Sync clock input let external gear and apps play along with the generator.Cmd+5): a zoomed, non-destructive editor for audio clips — trim, fades with selectable curves, gain, pitch shift, slice, reverse, and takes..mid/.midi files onto MIDI tracks or the empty timeline, and export MIDI clips from their context menu.Preferences > Shortcuts.The welcome screen shown when no song is open offers New Song, From Template... (start a new untitled song as a copy of an existing song), and Open Song..., plus one-click lists of your recent songs and the songs you recently used as templates.
File > New Song, or press Cmd+N. A new song starts with no tracks.Track > Add Audio Track or Track > Add MIDI Track, the Arrangement toolbar's + Audio and + MIDI buttons, or by dropping an audio or MIDI file on the empty timeline.Studio > Add MIDI Clip or Cmd+Shift+M.File > Save Song or Cmd+S.Only one song window is open at a time. If a song is already open, close it before creating a new song; opening another song replaces the current open song after any save prompt.
Magister Music can be downloaded and used for free in evaluation mode. In evaluation mode, the title bar shows [UNREGISTERED - SAVE/EXPORT DISABLED] after the Magister Music title.
Evaluation mode lets you create songs, open songs, edit tracks and clips, use Audio Unit plug-ins, use the piano roll and generator, arrange playback, mix, and automate. The following features are disabled until a valid license key is registered:
Cmd+S and Cmd+Shift+S.Cmd+Shift+E for WAV export.To register, choose Magister Music > Register License Key..., then enter the email address and license key you received. The license key can be long, so the registration window provides a wide entry field. If validation succeeds, the app shows a green checkmark, stores the registration in app preferences, removes the unregistered title-bar notice, and immediately enables saving, exporting, and MIDI copy.
You can obtain a license key by visiting the Magister.ai home page.
Use the tabs at the top of the app, the View menu, or the command-number shortcuts:
Cmd+1: ArrangementCmd+2: MixerCmd+3: Piano RollCmd+4: GeneratorCmd+5: Sample EditorTab: Toggle Arrangement/Mixer or Piano Roll/Generator, depending on the current view (from the Sample Editor, Tab returns to Arrangement)Arrangement view is the main timeline editor. Use it to create tracks, place clips, select time ranges, set loop regions, edit automation, and manage plug-ins on each track.
Mixer view is for monitoring and mixing. It shows a compact timeline overview at the top and mixer-style track controls with vertical meters at the bottom. The mixer is intended for viewing many levels at once without editing clips in the timeline overview.
Piano Roll view edits the notes inside the selected MIDI clip. Select a MIDI clip in Arrangement view, then switch to Piano Roll. The ghost-notes button (next to the zoom slider) shows other MIDI tracks' notes dimmed behind the clip you are editing, for lining up harmonies and rhythms across tracks.
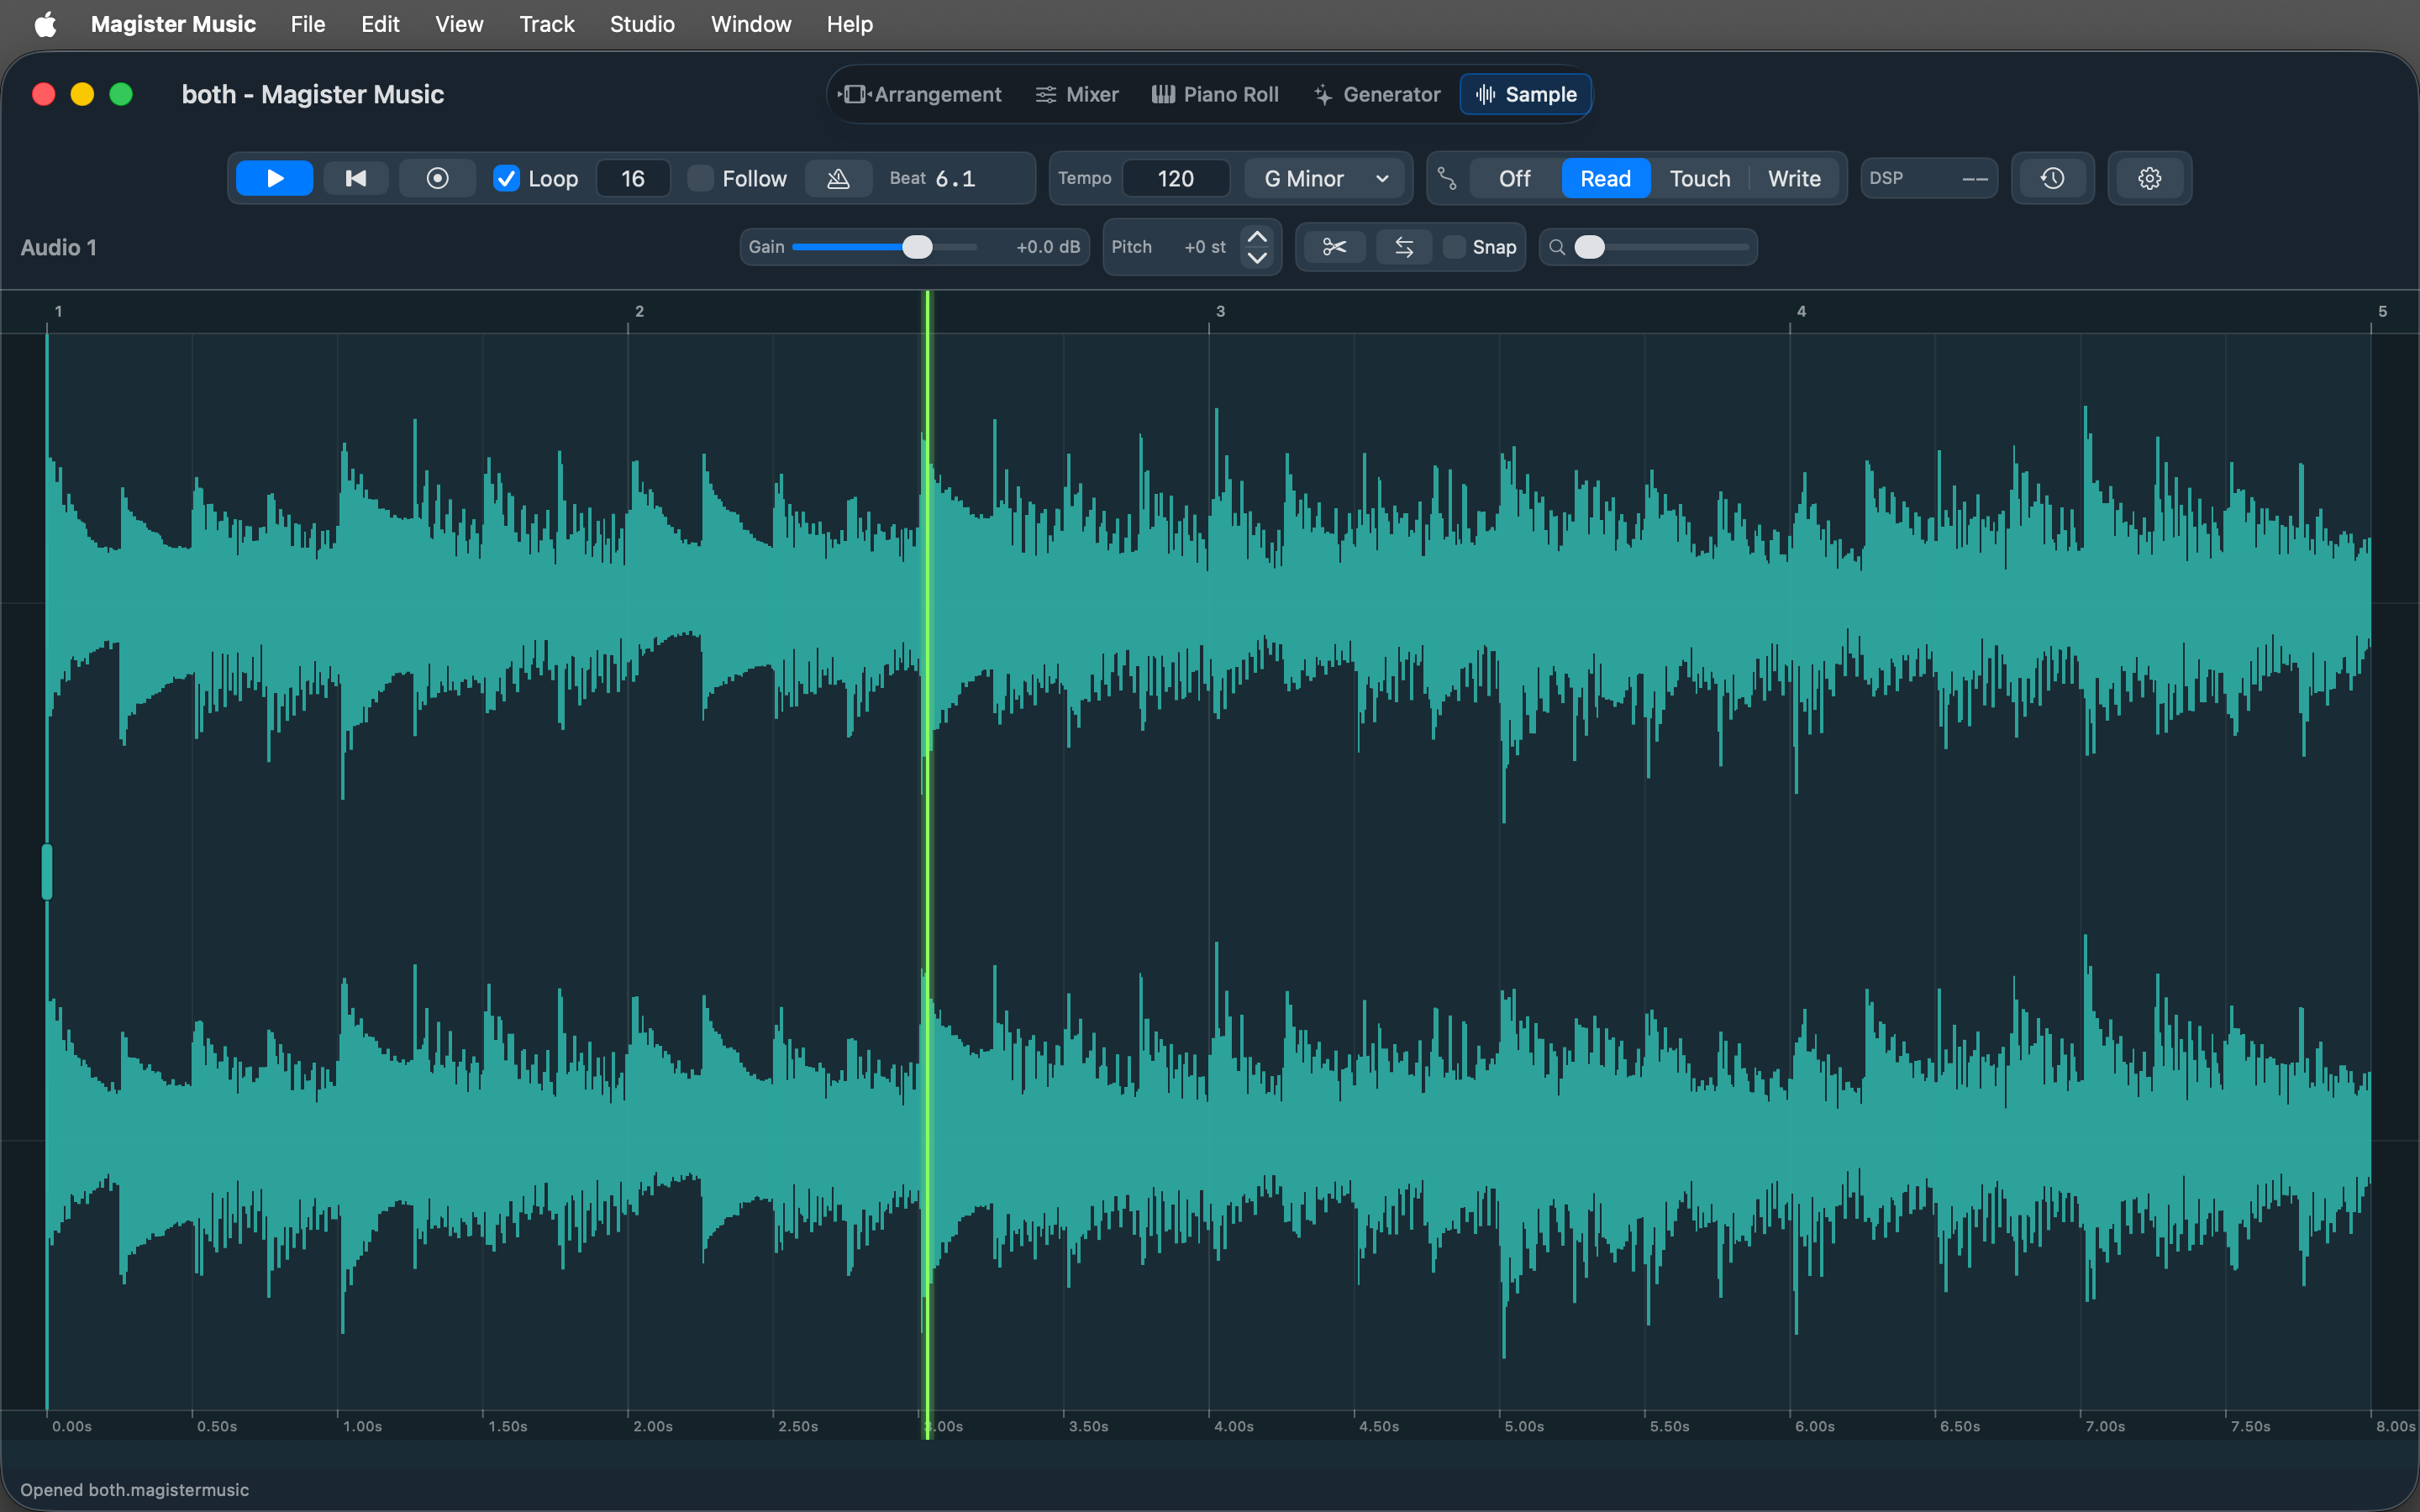
Sample Editor view is the audio counterpart of the Piano Roll: a zoomed editor for the selected audio clip. Double-click an audio clip in Arrangement view to open it.
Generator view is a statistical mechanism for rapidly generating musical ideas inside the selected MIDI clip, including novel chord and melody patterns. It is designed for fast iteration: choose musical parameters, generate a pattern, listen, adjust the probabilities, and generate again until something useful emerges.
The metronome button in the transport bar (next to Follow) plays a click during playback — a higher-pitched accent on each bar, ticks on the other beats — sized exactly to the song tempo. It rides the normal playback engine as a hidden track, stays audible while other tracks are soloed, and is never included in exports, stems, or frozen tracks. The setting persists across launches.
Every edit in a session is kept on an undo timeline (up to 80 steps). Besides Cmd+Z / Cmd+Shift+Z, the clock button in the top toolbar opens the History panel: redoable states are listed above the highlighted current state, past states below it, each labeled with the edit that produced it and how long ago it happened. Click any row to jump the whole project to that state in one step — jumping back leaves the newer states available for redo until you make a new edit, exactly like repeated single undos. History is per-session and is not saved into the song file.
The top toolbar contains grouped controls that apply across the app:
Space.Home.End.Page Up or Page Down.F9.Left/Right ±1 BPM, Up/Down ±5).Off, Read, Touch, or Write.Preferences > Interface, a red counter appears when render overloads or missed deadlines occur; rising counts suggest increasing the audio buffer size in Preferences.When playback starts, Arrangement view and the Mixer timeline overview center the starting playhead position when possible.
Magister Music can record audio input — a microphone or audio interface — into audio tracks.
Preferences > Audio > Input Device, or leave it on System Default.F9). Playback starts from the playhead and capture begins; macOS will ask for microphone permission the first time.While recording, a growing red region on the target track shows the material being captured, and a level meter beside the Record button shows the live input signal — green for healthy levels, red when close to clipping. When a recording covers existing clips on the track, the covered material is trimmed away and replaced by the new recording.
Recording with looping enabled captures takes: recording continues through each pass of the loop, and every pass becomes a take on a single clip spanning the loop region. The newest take plays by default; a badge on the clip shows which take is active (for example 3/5). Right-click the clip and open the Takes menu to switch takes, delete the current take, or keep only the current take. Recording again over the same span stacks another take onto the same clip. Anything played before the first full loop pass — a lead-in, or a partial first pass — lands as its own clip so nothing you played is lost.
Recordings that are discarded before saving are cleaned out of the song package automatically.
The loop region is a selected range of time that repeats during playback.
Cmd+L.Loop regions are also used by:
Arrangement view has its own toolbar:
1/32 through 2- and 4-bar grids.Cmd+I.Cmd+Shift+Delete or Cmd+Shift+Forward Delete..midi file./.+ Audio: add an audio track.+ MIDI: add a MIDI track.Paste Sample and Add MIDI Clip remain available from the menus (Cmd+Shift+V and Cmd+Shift+M).
Pasted and imported audio clips display waveform previews in the clip body. When an audio clip is looped by extending it to the right, the waveform preview tiles each repetition so the repeated sections visually match the original looped portion.
You can also drag files from Finder directly into the Arrangement view timeline. Drop a .wav or .mp3 file onto an audio track lane to place it as an audio clip at that timeline position, or drop a .mid/.midi file onto a MIDI track lane to import it as a MIDI clip. Dropping files on the empty region below the tracks creates matching new tracks automatically — audio files land on a fresh audio track, MIDI files on a fresh MIDI track.
Each track appears as a lane in the timeline.
In Arrangement view, track controls can include:
Right-click a track to open its context menu and rename it. You can also right-click a clip to rename that clip from its context menu.
Clicking an empty part of a track lane selects that track, so commands such as paste know which track to use. Clicking empty timeline space clears selected clips and selected tracks. Cmd-click and Shift-click track controls can select multiple tracks; edits to volume, pan, mute, solo, color, name, or send levels apply to the selected group.
Mute and solo are applied as mixer output gates. A muted or unsoloed MIDI track can keep its instrument and effects running internally while its track output is silent, so re-enabling the track does not require the MIDI sequence to restart.
Selected tracks can be copied, cut, pasted, deleted, or dragged as a group to reorder them.
The track color picker offers a standard palette plus a custom color well; custom colors you pick join the palette as swatches and persist across songs, so a hand-picked color can be reused anywhere.
A MIDI track's right-click menu also offers Freeze Track and Convert to Audio Track. Freezing renders the track — instrument and effects included — into a hidden audio file that plays in place of the live chain, dramatically lightening playback for heavy plug-ins; the track's controls stay visible, a badge marks the freeze stale after edits, and you can refreeze or unfreeze at any time. Convert to Audio Track performs the same render but replaces the MIDI track with a permanent audio track.
When track controls are collapsed in Arrangement view, MIDI tracks still show a compact gear button for opening the loaded instrument editor when available.
Volume sliders in Arrangement and Mixer snap to 0.5 dB increments. If a track has volume or pan automation, the matching track-control slider is disabled until that automation lane is deleted.
Cmd-click clips to add or remove clips from the selection.Shift-click another clip to select clips in between.Delete to delete the current selection.Cmd+D to duplicate the primary selected clip immediately after itself.0 to disable or enable selected clips.Cmd+V to paste copied clips after the primary selected clip, at the clicked paste destination, or at the playhead if no clip or paste destination is active.Disabled clips are grayed out and do not play. When a MIDI clip is re-enabled during playback, future note-on events can play without waiting for a full graph rebuild; latch-style clips resume when their next trigger occurs.
When multiple clips are copied across tracks, pasting preserves their relative timing and track offsets. While looping playback runs, clicking in an arrangement track sets the clicked position on that track as the paste destination without disturbing the playhead; when playback is stopped, clicks position the playhead as usual.
Drag across an empty area of the arrangement timeline to define a new loop region in the top loop band.
If there is no rectangular time selection, adding a MIDI clip uses the loop region as the target range when possible.
Clips can have their own looped playback range. Before a clip is looped, drag the lower-right edge to adjust the clip length, or drag the upper-right edge to begin looping the clip. After looping is enabled, dragging the right edge of the looped portion adjusts the clip loop length, letting you extend or shrink the repeating region without changing the underlying clip start.
When multiple clips are selected, changing the loop length of one selected clip changes the selected clips together.
The master row stays pinned to the bottom of Arrangement view, so it remains available even when a song has enough tracks to scroll vertically.
When dragging clips far left or right, the arrangement can scroll so you can continue moving the clips beyond the currently visible timeline.
Dragging the loop region left or right can also scroll the arrangement when you reach the visible edge.
Use the mouse wheel or trackpad scroll gesture over the Arrangement timeline header or time ruler to zoom horizontally around the pointer. Double-click the loop region header to fit the whole song in the view. Timeline zoom is saved with each song, so every song reopens at the zoom you left it.
Mixer view combines a compact timeline overview with mixer controls.
The top section shows thin track lanes with clip placement, track colors, loop region, and playhead. Use it to see where material exists in the song. You can set the playhead and adjust the loop region from this overview: drag in the timeline to define a new loop range, drag the loop region's right edge to lengthen or shorten it, and nudge the loop region with the Left and Right arrow keys while the pointer is over the overview. Clicking a clip in the overview selects it (and its track) so Cmd+L can set the loop region around it — clip selection carries over when switching between Arrangement and Mixer. Use the mouse wheel or trackpad scroll gesture over the overview to zoom horizontally around the pointer. The overview is not meant for rearranging clips: there are no clip context menus or editing keys in the Mixer.
The lower section shows track controls and compact responsive meters. Use it to monitor levels, mute and solo tracks, and adjust volume and pan. Hovering a volume or pan slider arms the arrow keys — Left/Right for fine adjustments, Up/Down for larger steps — with no click needed. The track name sidebar sizes itself to the longest track name whenever the Mixer becomes active. The meter section scrolls horizontally when there are more tracks than fit onscreen, and selecting a track scrolls its bottom control into view when needed.
Mixer track controls are compact, and the master strip uses the same control width as regular tracks. Track numbers appear before track names in both Arrangement and Mixer.
When the mixer controls are wider than the window, the master strip stays pinned at the far right while the track strips scroll underneath it.
Click a mixer track to select it, Cmd-click to add or remove individual tracks, or Shift-click to select a range. Edits to volume, pan, mute, and solo apply to the selected mixer tracks. Empty mixer space clears the track selection.
Mixer track controls show the current instrument and effects with gear buttons for opening plug-in windows, but choosing instruments and editing effect chains is done from Arrangement view.
Mixer view has its own horizontal zoom slider and supports the same horizontal zoom shortcuts as other timeline views. The loop-region shading updates while you drag the loop region, and timeline bar markers continue to render at readable intervals when the mixer is zoomed far out.
Piano Roll view edits notes in the selected MIDI clip.
Use Piano Roll to:
The toolbar includes separate Timing and Length button groups such as 1/32, 1/16, 1/8, 1/4, 1/2, and 1. Timing controls note placement and quantize timing; Length controls created note duration plus quantize/unquantize length. The clip length can also be typed directly in beats.
To adjust an individual note's duration directly, drag the right edge of the note to the desired length.
Piano Roll note entry follows the current key and scale: Magister Music does not create new notes outside the selected scale.
The velocity-lane button (next to the ghost-notes button) shows an editable velocity lane pinned below the note grid: each note appears as a bar, drag a bar to set its velocity, or use the scroll wheel over a bar to nudge it. Notes sounding together are staggered slightly so every bar stays visible, and selected notes' bars are highlighted.
The Chord menu stamps diatonic chords: pick a shape (triad, seventh, and more) and each click enters the full chord built on the clicked scale degree, following the current key and scale. Set it back to none for single-note entry.
Legato extends each selected note to the start of the next, removing the gaps between them.
The Swing menu sets a swing amount that Quantize applies: offbeats land late by the chosen percentage. The status line reports whether the swing touched any offbeats, so you know when a pattern had none to move.
Clicking an in-scale pitch row adds a note when no note is under the pointer. Clicking an out-of-scale pitch row deselects selected notes, or moves the playhead if no notes are selected. Cmd-click toggles individual note selection, and Shift-click adds only notes that intersect the vertical line between the existing selection and the clicked note. Selected notes move, resize, and right-click-delete together, and vertical movement snaps notes to the closest pitch in the current scale.
Useful Piano Roll shortcuts:
Shift+Up: move selected notes up one octave.Shift+Down: move selected notes down one octave.Cmd+U: quantize selected MIDI notes.Cmd+A: select all MIDI notes in the selected clip when Piano Roll view is active.Delete: delete selected notes.The Sample Editor shows the full source recording of the selected audio clip as a zoomable waveform, with the part the clip actually plays highlighted as a bright window over the dimmed source. Double-click an audio clip (or use its context menu's Open in Sample Editor) to jump straight there. All edits are non-destructive clip parameters; the audio file on disk is never modified.
Snap enabled, trims land on the arrangement grid; disable it for fine trims.Gain slider in the header sets clip gain in dB and scales the drawn waveform.Pitch stepper shifts the clip up or down by semitones (up to two octaves each way) without changing its timing, non-destructively — set it back to 0 to restore the original pitch.Snap toggle). Press Delete to silence the selected range — the clip splits around it and the middle is removed, leaving a gap — or right-click and choose Ripple Delete Selection to remove the range and slide the later material left.Delete Take and Keep Only This.Because looping audio clips repeat their source, double-clicking an audio clip now opens the Sample Editor; toggling looping moved to the clip's context menu (Loop / Disable Loop).
Generator view works with the selected MIDI clip and is aimed at rapidly creating, exploring, and reshaping musical ideas. It is not just a random-note tool; it is a statistical pattern generator that uses the parameters you choose to produce chord shapes, melodic movement, rhythmic spacing, rests, note lengths, velocities, and timing feel.
Two half-locked regenerate buttons refine a result you partly like: New Rhythm keeps the current pitches in order and generates fresh timing; New Pitches keeps the rhythm exactly and takes fresh pitches. Save and Revert bracket experiments.
The intended workflow is iterative. Start with a selected MIDI clip, choose broad settings such as model, pattern type, and sequence length, then refine the result with the colored parameter controls. You can quickly regenerate ideas, save a result you like, revert if a later change is not useful, and copy the generated MIDI for use elsewhere.
The colored controls at the bottom shape the statistical behavior of the generator. They let you guide the output toward certain pitch ranges, note lengths, rests, and other musical tendencies without manually placing every note. This makes Generator view useful for sketching parts, finding unexpected chord or melody patterns, and building variations around a musical direction.
The Model setting controls the character of the generated patterns. The best choice is often a matter of experimentation and personal taste: some models tend to favor repetition, while others may lean toward ascending motion, wider variation, or different rhythmic shapes.
Generator controls include:
Choosing a pattern or changing Temperature does not regenerate by itself. Timing Variance affects only newly generated or regenerated notes. Regeneration happens when you use the generate command, click or right-click a section of the generator grid, or use the mouse wheel over a section. As a shortcut, using the mouse wheel over a generator section regenerates only that section.
The mouse wheel can also adjust the height of the colored probability bars at the bottom of Generator view. Right-clicking a bottom probability bar sets it to zero, and double-clicking a bar sets it to full. If all octave, pitch, chord size, or note length bars are zero, generate/regenerate does nothing. New generator clips default the 1/8 note length bar to full.
Generator settings are stored with MIDI clips. Duplicated and pasted MIDI clips keep their generator settings, and merged MIDI clips preserve compatible generator settings when possible.
MIDI tracks can host Audio Unit instrument plug-ins. When you add an instrument, the plug-in window opens so you can configure it immediately.
Instrument selection is edited from Arrangement track controls. Mixer track controls show the current instrument name and gear button but do not offer the instrument picker.
Plug-ins can be organized into named groups in Preferences > Audio Units: create a group, then assign plug-ins to it. Grouped plug-ins appear inside matching submenus in the instrument and effect pickers, keeping long plug-in lists navigable; ungrouped plug-ins stay at the top level.
Tracks and the master channel can host effect plug-ins. In Arrangement view, effects can be added, opened, bypassed, copied, pasted, reordered, and removed from track controls.
The Add menu also offers two built-in audio effects. The Compressor is a full-featured dynamics compressor with threshold, ratio, knee, attack, release, and makeup gain, a gain-reduction meter, and sidechain keying — choose any other MIDI or audio track as the key source to duck against it. The Limiter is its brickwall sibling with input gain, ceiling, and release. Both are saved with the song, work on tracks, buses, and the master, support Space for play/pause while their window is focused, allow arrow-key nudging of a hovered slider (Left/Right fine, Up/Down coarse), and expose every parameter for automation — the panel sliders animate while automation plays.
When a MIDI track carries built-in MIDI effects, the hammer button in the Effects header bakes them into the notes: every clip takes the chain's output and the MIDI effect slots are removed — an ordinary undoable edit, useful before fine-tuning individual notes.
The automation sidebar's copy and paste buttons transfer a lane's shape between any parameters: copy a volume lane on one track, select any lane on another (a send, a plugin parameter), and paste — values are normalized, so the shape carries over; points land at the playhead.
MIDI tracks can also host the built-in MIDI effects (Arpeggiator, Chord, Transpose, Scale, Strum, Ratchet, Euclid, Note Echo, Swing, Humanize, Chance, Length, Velocity, and Mirror) from the same Add menu. They transform the track's notes non-destructively, in chain order, before the instrument — the piano roll keeps showing the original notes. Transpose shifts every note by a set number of semitones with no scale snapping; use the Scale effect instead when the result should stay in key.
You can copy an effect plug-in from one track and paste it into another track.
An entire effects chain can be saved as a named preset from the bookmark menu in the Effects header, including each plug-in's full settings. Presets are stored with the app — not the song — so a chain saved in one song can be applied in any other. Applying a preset can replace the current chain or append to it, and works for both tracks and the master channel. Effects in a preset that reference plug-ins not currently enabled are skipped with a message. Saving with an existing preset name replaces that preset, and presets can be deleted from the same menu.
When you add an effect, the plug-in window opens automatically.
In Mixer view, effects are displayed by name with gear buttons for opening their plug-in windows, but bypass, copy/paste, reorder, and delete controls are hidden.
Use Studio > Toggle Plug-in Windows or Cmd+Option+P to close and reopen the set of plug-in windows you currently have open.
If you manually close a plug-in window, that plug-in is removed from the remembered set for the toggle command.
While a plug-in window is focused, pressing Space controls app playback.
Plug-in editor windows automatically match the size of the plug-in's interface. Plug-ins that support resizing offer their own control for it — typically a grip in the lower-right corner of their interface or a zoom/size setting in their own menus — and the window follows whatever size the plug-in chooses.
Buses are shared effect channels. A track can send part of its signal to a bus — for example one reverb on a bus, fed by several tracks at different levels — and the bus mixes into the master.
+ Bus button above the track controls in Arrangement view, next to the collapse-all control. Bus strips appear in the Mixer between the track strips and the master strip.Effects / Sends section in the Arrangement track controls. Use the Add menu and choose Send to <bus> to create a send — tracks have no sends until you add one. Each added send shows a row with a level slider, a percentage readout, and a remove button.Automation lets track or plug-in parameters change over time.
The global automation mode is in the top toolbar:
In Arrangement view, use the track automation controls to show automation lanes, choose a parameter, and edit points.
Automation parameter menus include standard MIDI controls and plug-in-specific controls after you touch or adjust those controls in the plug-in editor. Touched plug-in automation controls are saved with the song so they are available when the project is reopened.
Automation menus group available parameters and include effect or instrument names where available, so touched plug-in controls are easier to distinguish.
Common automation actions:
Volume and pan automation disables the matching track-control slider in Arrangement and Mixer so manual slider changes do not fight the automation lane. Deleting that automation data re-enables the slider.
A Mute automation lane gates the track's output over time: points snap to on/off (high means playing), clicking adds a step at the clicked position, and dragging a step point moves its companion with it, keeping the steps square.
Automation belongs to its clips when you rearrange: moving or nudging clips — including to another track with the Up/Down arrows or a drag — carries the covered automation along, shows a ghost preview of the traveling curve during the drag, and asks before overwriting automation already present at the destination. The selected lane also draws dimmed ghost curves of the track's other lanes for alignment.
While playback is stopped, clicking around the timeline pushes each automated parameter's value at that position to its plug-in, so open plug-in windows show the knobs where the curves put them — the same following that happens live during playback.
Magister Music includes time-based editing commands that use the loop region:
Edit > Insert Silence or Cmd+I: insert empty time at the loop region.Edit > Delete Time or Cmd+Shift+Delete: remove the time covered by the loop region.Delete Time removes content inside the loop region and ripples later clips and automation points left by the deleted duration. These commands affect the arrangement timeline, so set the loop region carefully before using them.
View > Sample Browser opens a floating window for browsing sample libraries. Add any number of folders or individual files — with the Add Folder button or by dragging them in from Finder — and access persists across launches. Folders are searched recursively and include audio files (wav, aif, mp3, m4a, caf, flac) and MIDI files (mid, midi). The segmented control at the top chooses the display: Folders shows the directory tree (folders with no browsable files anywhere inside are hidden; each shows its file count), and All Files lists every file found across all folders as one flat, name-sorted list — no drilling down. Click the play button on any audio row to audition it. To use a file: double-click it to insert it at the playhead — audio lands on the selected audio track, MIDI on the selected MIDI track (a matching track is created if the song has none) — or drag it onto a track at exactly the position you want. Right-click a top-level item to remove it from the browser. Auditioning plays through a lightweight built-in player and never interrupts song playback; MIDI rows show a piano icon and are placed rather than auditioned.
Use the File menu for song and export operations:
Cmd+NCmd+OCmd+SCmd+Shift+SCmd+Shift+EExport dialogs default to the current song name. Exports render hosted Audio Unit instruments and effects, not only raw clips. The export progress bar is monotonic, including during MP3 export.
If a valid loop region exists, export uses the loop region as the export range even when loop playback is disabled. The export dialog shows the range before rendering.
Saving and exporting are available only after registering a valid license key. In evaluation mode, those menu items and shortcuts are disabled.
When a song opens, a Loading Plugins progress dialog shows each plug-in as it prepares, so larger sessions make their startup progress visible.
If you close a song with unsaved changes, Magister Music asks whether to save before closing.
Closing the song window quits Magister Music. To continue working, reopen the app and choose File > Open Song or File > New Song.
Open Preferences from the top toolbar or with Cmd+,.
Preferences include audio and plug-in related settings, including Audio Unit discovery and rescan behavior.
The Audio section shows the current device buffer size and lets you request a new buffer size for the current default audio devices. Increasing the buffer size can improve playback stability and may help support more simultaneous tracks or heavier plug-in chains, at the cost of higher response latency.
The Audio Units section lets you enable or disable the instrument and effect plug-ins that appear elsewhere in the app. It also manages plug-in groups: create named groups and assign plug-ins to them, and the instrument and effect pickers present each group as a submenu.
The Audio section also includes an Output Device picker for choosing which audio device Magister Music plays through, alongside the Input Device used for recording.
The Interface section lets you set the main window's width and height directly, which is useful for matching a specific display layout. It also chooses whether the Arrangement track controls sit on the right (the default) or the left side of the timeline, and lets you edit the track color preset palette.
The Interface section also has Background controls for coloring the app's background. The Hue slider picks the color — blue, red, green, and so on — and the Intensity slider ranges from the classic near-black look up to a fully colored interface. The background is always kept dark enough that text and controls remain readable. Changes apply immediately, the Left and Right arrow keys nudge a focused slider in fine steps, and Reset to Default restores the standard look.
When exporting, the save dialog offers Normalize loudness to with an adjustable LUFS target (-36 to -3; streaming services commonly use -14): the mix is measured (ITU-R BS.1770) and its gain adjusted to the target, with peaks kept below -1 dBFS. The checkbox and target are remembered between exports.
The Mixer's master strip shows a live loudness readout: short-term LUFS (K-weighted, 3 seconds) and RMS (400 ms) of the master output.
The Colors controls set the playhead color used in every timeline view and the note color used by the Piano Roll and Generator, each with its own Reset button.
The Autosave controls set how often Magister Music saves a crash-recovery copy of the open song while you edit (60 seconds by default), and autosave can be turned off entirely.
The Toolbar control chooses whether the DSP readout shows the red missed-deadline counter; it is hidden by default.
The Shortcuts section lists configurable app shortcuts by category. Click a shortcut to record a replacement key command, use Reset to restore an individual default, Clear to leave an action unmapped, or Reset All to restore every default shortcut.
The Help menu includes both the bundled Magister Music User Guide and a Website item that opens the Magister Music product page.
The shortcut tables list the default shortcuts. Many defaults can be changed or cleared in Preferences > Shortcuts.
Beyond the defaults below, Preferences > Shortcuts also lists many actions that ship without a key — mute/solo/freeze/rename the selected track, slice/merge/reverse/rename clips, silence editing, take switching, clip gain and pitch nudges, MIDI note tools, generate, tempo nudges, loop-region resizing, follow-playhead, the automation mode, the undo history panel, and more (grouped by category: Track, Clip, Takes, MIDI, Generator, Transport). Click any of them and record a key to put it on your keyboard.
| Shortcut | Action |
|---|---|
Cmd+N | New song |
Cmd+O | Open song |
Cmd+S | Save song, registered mode only |
Cmd+Shift+S | Save song as, registered mode only |
Cmd+Shift+E | Export WAV, registered mode only |
Cmd+, | Preferences |
Cmd+? | User guide |
| Shortcut | Action |
|---|---|
Cmd+1 | Arrangement view |
Cmd+2 | Mixer view |
Cmd+3 | Piano Roll view |
Cmd+4 | Generator view |
Cmd+5 | Sample Editor view |
Tab | Toggle Arrangement/Mixer or Piano Roll/Generator, depending on the current view; returns to Arrangement from the Sample Editor |
Cmd++ or Cmd+Shift+= | Zoom in horizontally |
Cmd+- | Zoom out horizontally |
| Shortcut | Action |
|---|---|
Space | Play or pause |
Home | Return to start |
End | Jump to the end of the last clip |
Page Up | Move playhead to previous bar |
Page Down | Move playhead to next bar |
F9 | Toggle MIDI recording |
Cmd+L | Toggle loop, or set loop from selected clips or selected empty time |
| Left/Right Arrow | Nudge the loop region by its own length while the pointer is over the loop region header or the Mixer timeline overview |
| Shortcut | Action |
|---|---|
Cmd+T | Add audio track |
Cmd+Shift+T | Add MIDI track |
Cmd+Shift+M | Add MIDI clip |
Cmd+I | Insert silence at loop region |
Cmd+Shift+Delete | Delete time in loop region |
Cmd+Shift+Forward Delete | Delete time in loop region |
A | Toggle selected track automation |
| Shortcut | Action |
|---|---|
Cmd+C | Copy selection |
Cmd+X | Cut selection |
Cmd+V | Paste selection |
Cmd+Shift+V | Paste audio sample |
Cmd+D | Duplicate selection |
Delete | Delete selection |
0 | Disable or enable selected clips |
| Left/Right Arrow | Nudge selected arrangement clips by the current arrangement grid value |
Cmd-click | Add or remove clips from selection |
Shift-click | Select a range of clips |
| Shortcut | Action |
|---|---|
Cmd+U | Quantize selected MIDI notes, or the full clip if no notes are selected |
Cmd+A | Select all MIDI notes in the selected clip when Piano Roll view is active |
| Arrow keys | Nudge selected MIDI notes |
Shift+Up | Move selected MIDI notes up one octave |
Shift+Down | Move selected MIDI notes down one octave |
| Shortcut | Action |
|---|---|
| Arrow keys | Nudge selected automation point |
| Shortcut | Action |
|---|---|
Cmd+Option+P | Toggle remembered plug-in windows |
Space | Play or pause while a plug-in window is focused |
Cmd+L with selected clips to quickly loop around them.Magister Music uses the LAME MP3 Encoder version 3.100 for MP3 export.
LAME is licensed under the GNU Library General Public License, Version 2. Commercial use is permitted under the LGPL when LAME is linked as a separate library, use of LAME is acknowledged, and any modifications to LAME are released under the LGPL.
LAME project: www.mp3dev.org
Source archive used for the bundled library: https://fossies.org/linux/misc/lame-3.100.tar.gz